The Easy Olive Tapenade Recipe Beginners Trust


An easy olive tapenade recipe I make when bread hits the table before dinner exists. Quick, briny, and always useful.

Jump to:
When someone tells me they cannot cook, I believe them. I remember feeling that way myself. More often than not, it is about trust in the kitchen, not ability.
That is where this olive tapenade comes in. I don’t hand them a plan or a list of steps meant to impress. I hand them olives and say start here.

This recipe lives on my counter more than on paper. It is the thing I make when Leo is asking for bread topping before dinner exists and when Lin wants to help but then loses patience halfway.
It is also the thing I make when friends come over unexpectedly and I want something on the table that looks intentional without taking me away from the room. Ten minutes passes quickly when you’re still talking.
Olives have always felt steady to me. They showed up early in my life, long before I thought of myself as someone who writes recipes. Bowls of olives were placed on the table early. Sometimes before bread, sometimes alongside labneh or cucumber salad, always something to pick at while family conversations unfolded. This tapenade holds all of that without trying to explain itself.
I have made versions that were too smooth and felt heavy. Skipped lemon and missed the lift it brings. I have learned how far olive oil can go before it softens everything too much. Those mistakes taught me where to stop. The version below is the one I trust, the one I make without measuring, the one I can talk someone through while standing beside them.

This bowl often shares space with other familiar things. A spoonful next to labneh reminds me why olives and dairy belong together, much like this labneh dip with olives that lives in my fridge on busy weeks. Some days it finds its way onto a yogurt and olive oil gluten free galette crust before vegetables even arrive. In warmer months, it sits beside tzatziki sauce, both pulled from the same family of flavors yet doing different jobs.
What I like most about this olive tapenade is that it teaches quietly. Pulse, stop, taste, adjust. That rhythm builds confidence without asking for attention. People leave with more than a recipe. They leave knowing they can do this again.
Ingredients

- Kalamata olives – This recipe stands on the olives, so quality matters. Kalamatas bring depth, color, and a natural balance of salt and fruitiness that holds up without added seasoning. I use olives I would snack on straight from the jar. If Kalamatas are unavailable, other brined Mediterranean olives like Niçoise or Greek black olives can work, though the tapenade will taste lighter and less rounded.
- Capers – Capers sharpen the olives and keep the mixture from feeling flat. Their briny bite cuts through the richness and makes the tapenade usable beyond bread, especially with vegetables or cheese. I drain them well every time. If needed, finely chopped green olives can replace capers, though you lose that clean snap.
- Fresh lemon juice – Lemon keeps everything in balance. It brightens the olives and lets the tapenade sit comfortably next to dairy or baked dough. I avoid bottled juice here. Red wine vinegar can step in sparingly, though lemon keeps the profile cleaner.
See the recipe card for full list and exact quantities.
How to Make this Easy Olive Tapenade Recipe

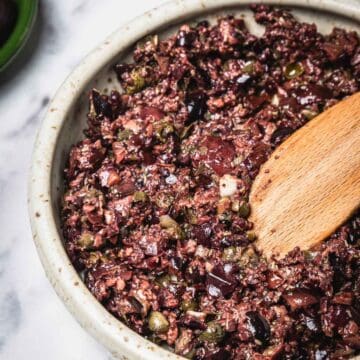
Homemade tapenade rewards attention more than speed. Each step is brief, but what you notice along the way matters. Watch the texture, pause to taste, and let bright, briny, and nutty notes stay in balance. Here is how to bring this appetizer together in easy steps:
Start with the Base Ingredients

- Too much brine at this stage can push the mixture toward a paste later. When you begin pulsing, use short bursts rather than a steady blend. You should see the olives break down into small pieces, with capers still visible and garlic evenly dispersed.
- Stop early and scrape the sides if needed. At this point, the mixture should look chopped and textured, not spreadable yet.
Control the Texture
- This is where most tapenade goes wrong. Keep pulsing in brief intervals, checking often. You are looking for a coarse consistency where each ingredient still holds its shape.
- If the mixture starts sticking together in clumps or looks wet and glossy, you have gone too far. A spoon dragged through it should leave a rough trail rather than a smooth one.
Add Lemon and Olive Oil Carefully

- The tapenade should look cohesive but uneven, with visible bits of olive and caper throughout. If it suddenly looks shiny and loose, stop immediately. You cannot undo over-blending, but you can always pulse once more if needed.
Taste and Adjust

- Some olives carry more salt than others, and capers vary widely. You should notice balance first, not sharpness or heaviness. If something feels off, adjust lightly. A few drops of lemon can help, but avoid adding more oil unless the mixture feels dry and crumbly.
Rest or Serve

- If you refrigerate it, expect the texture to firm up slightly as the olive oil cools. Let it sit at room temperature for a few minutes before serving so it loosens again. Use it as a spread, a dip, on toast or crackers, or even a finishing spoonful where something salty and structured belongs.
Storage

Transfer the olive tapenade to a clean, airtight container and refrigerate it for short-term storage. It keeps well in the fridge for up to one week. The olive oil will firm as it chills, so let the tapenade sit at room temperature for a few minutes before serving to loosen the texture and bring the flavors back into balance.

For longer storage, freezing is possible but not ideal. While the tapenade will keep frozen for up to two months, the texture can soften once thawed. If you do freeze it, store in a tightly sealed container and thaw slowly in the refrigerator, then stir well before using.
Top Tips
Start with olives you would eat on their own – tapenade cannot hide tired or dull olives. If the olives taste flat straight from the jar, the finished bowl will feel the same. I always taste one before starting. It saves the recipe before it even begins.
Dry ingredients matter more than speed – excess brine from olives or capers is the fastest way to lose structure. A quick drain and light pat keeps the mixture chopped instead of loose, especially if you plan to refrigerate it.
Use the food processor in pulses, not autopilot – most recipes do not say when to stop, and that is where texture disappears. Short pulses give you control and help keep visible pieces that make the tapenade spoonable rather than spread-thin.
Recipe
Tried and loved this recipe? Please leave a 5-star review below! Your reviews mean a lot to me, so if you’ve got any questions, please let me know in a comment.
Easy Olive Tapenade
This easy olive tapenade recipe stays coarse, briny, and flexible for spreads and boards
Prevent your screen from going to sleep
Ingredients
- 1 cup pitted Kalamata olives
- 2 tablespoons capers drained
- 2 garlic cloves
- 2 tablespoons fresh lemon juice
- ¼ cup extra-virgin olive oil
Instructions
Chop the base
-
Add the olives, capers, and garlic to a food processor. Pulse in short bursts until everything looks coarsely chopped with visible pieces, not a paste.
Taste and finish
-
Taste and adjust if needed, then serve right away or chill. Use as a spread, dip, or topping.
Nutrition
Serving: 240gCalories: 640kcalCarbohydrates: 14gProtein: 5gFat: 54gSaturated Fat: 9gPolyunsaturated Fat: 7gMonounsaturated Fat: 45gSodium: 3100mgPotassium: 420mgFiber: 7gSugar: 1gVitamin A: 120IUVitamin C: 12mgCalcium: 90mgIron: 3.2mg
Measuring Cups and Spoons


")


Post Comment