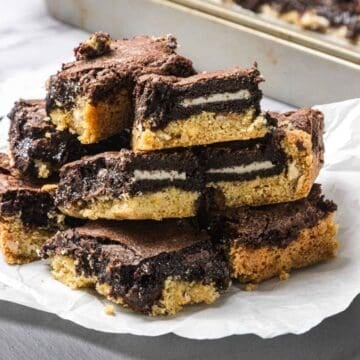
Why These Gluten-Free Slutty Brownies Bake Reliably Every Time


These gluten-free slutty brownies take a loud internet dessert and turn it into a recipe that actually works at home.

Jump to:
There are nights when I sink into the couch, promise myself five quiet minutes, and then end up watching sped-up brownie videos while the laundry hums and toy blocks wait to be stepped on.
Slutty brownies arrived in my life on one of those nights, stacked in three dramatic layers on my phone screen while the kids finally slept and my husband scrolled beside me in his own little stream of notifications.

Part of me wanted to roll my eyes. Cookie dough, chocolate sandwich cookies, brownie batter, all in one pan. The mom part of my brain whispered something about sugar. The woman who writes about food leaned closer.
This is how many of you meet recipes now, in fifteen seconds with captions and trending audio. My strange everyday is moving between producing those clips and my real kitchen, turning trends into something that works for a gluten-free pantry and an actual family.
I treated these slutty brownies the way I treat my halva brownies and vegan chocolate chilli brownies. Curiosity first, then a notebook. I tested which gluten-free flour held together in the cookie base without turning sandy. Checked how thick that layer needs to be so it can hold gluten-free sandwich cookies without collapsing.
I watched the brownie layer in the oven so the center stayed fudgy while the corners did not dry out, and I wrote clear cooling times because I know some of you bake with kids hovering and asking if it is ready yet.

There is no childhood story tied to this pan. It belongs to this season of life, when the kids are asleep, my husband is nearby, and ideas still buzz. It lives in the space where work, scrolling, and feeding my family overlap, and where recipes need to function as both.
So I am direct about them. These aren’t an everyday dessert in our home. They are a birthday tray, a “we survived this week” pan, the thing I send to friends who ask for something outrageous.
They are also tested, gluten-free from top to bottom, written by someone who has burnt enough brownies and broken enough cookie bases to know what matters.
Ingredients

- Gluten-Free Flour Blend (with xanthan gum) – This is the backbone of the cookie layer. I use a cup-for-cup blend that already includes xanthan gum because it keeps the dough from crumbling when pressed into the pan. I tested this recipe with blends that needed added binders, and the texture felt fragile once baked. If your blend does not include xanthan gum, add a small pinch. Almond or oat flour alone will not behave the same way here and tend to sink under the brownie layer.
- Butter – Softened butter gives the cookie base structure and that familiar chewy that holds up under the weight of brownies and cookies. I tried melted butter once during a late-night bake, and the layer baked flatter and denser than I wanted. Dairy-free butter sticks can work if they are firm and designed for baking, not spreadable tubs.
- Gluten-Free Sandwich Cookies – These cookies form the oreo layer in the middle, fusing the cookie and brownie layers together. Any gluten-free chocolate sandwich cookie works here. I avoid thinner cookies because they disappear into the batter instead of staying recognizable like oreos once sliced.
- Gluten-Free Brownie Mix – A boxed gluten-free brownie mix keeps this recipe reliable and repeatable, which matters when baking for kids or crowds. Use one that bakes up dense rather than cake-like, and follow the package directions for eggs and liquid.
See the recipe card for full list and exact quantities.
How to Make Slutty Brownies Recipe

If you have ever watched this recipe come together online and wondered whether it would actually work in a real kitchen, this is where it becomes manageable. Each step builds toward a pan that cuts clean and holds its shape, even though the result feels decadent. Here’s how to make slutty brownies, one layer at a time:
Prepare the Pan and Oven
- Set the oven to 350°F and line a 9×13-inch pan with parchment paper, leaving some overhang on the long sides. That overhang matters later. The pan should feel fully lined, not loosely draped, so the bottom layer presses flat.
Mix the Cookie Dough Layer


- After mixing in the dry ingredients, the dough should feel soft but sturdy, closer to a thick paste than a batter.
Add in the Chocolate Chips

- They should hold their shape without sinking or streaking the dough.
Mix the Cookie Dough Layer

- Use your hands or the bottom of a measuring cup. The surface should feel compact and level, with no thin patches at the corners. If the dough sticks to your fingers, lightly dampen them rather than adding flour, which can dry out the base.
Add the Sandwich Cookie Layer

- They should sit flat, touching but not overlapping. This layer acts as a barrier, so gaps can cause the brownie batter to seep down unevenly.
Prepare and Add the Brownie Batter


- The finished batter should be thick, glossy, and slow-moving. Use a spatula to spread it lightly. Avoid pressing down, which can crack the cookie layer underneath.
Bake Until Set but Soft

- A toothpick inserted into the brownie layer should come out with moist crumbs, not raw batter. Overbaking here leads to a dry top and compressed middle.
Cool Completely Before Cutting

- The layers will firm as they cool, and cutting early will cause smearing and collapse. Once cool, lift the slab out using the parchment and slice with a sharp knife, wiping between cuts.
Serve at Room Temperature

- These brownies slice the cleanest and taste best once they’re fully set and served at room temperature! Enjoy with a cup of hot cocoa or coffee.
Storage

Store the brownies in an airtight container at room temperature for up to 2 days. If your kitchen runs warm, refrigeration is a better option. In the refrigerator, the brownies keep well for up to 5 days. Place parchment between layers to prevent sticking. Let them sit at room temperature for 20 to 30 minutes before serving so the cookie layer loosens slightly.

For longer storage, freeze fully cooled slices in the freezer, wrapped tightly, for up to 2 months. Thaw at room temperature. Avoid microwaving, which can cause the layers to separate and turn uneven.
Top Tips
Choose a dense brownie mix – not all gluten-free brownie mixes behave the same way. Look for one that bakes up fudgy rather than cake-like. Lighter mixes tend to puff and crack, which can pull away from the cookie and sandwich cookie layers underneath.
Press the cookie layer firmly, especially at the edges – the bottom layer needs to act like a base, not a crumb. Spend extra time pressing the corners and sides so they bake evenly and support the weight above. Thin spots show up later as broken edges when slicing.
Recipe
Tried and loved this recipe? Please leave a 5-star review below! Your reviews mean a lot to me, so if you’ve got any questions, please let me know in a comment.
Slutty Brownies
Gluten-free slutty brownies with clear layers and a soft center, tested for real home baking.
Prevent your screen from going to sleep
Ingredients
Oreo layer
- 18 gluten-free Oreo-style sandwich cookies
Brownie layer
- 1 box gluten-free brownie mix (18 oz)
- Eggs and liquid ingredients listed on the box eggs, oil, water
Instructions
Mix dry ingredients for cookie layer
-
In a bowl, whisk gluten-free flour blend, ½ teaspoon baking soda, and ½ teaspoon salt until evenly mixed.
Press cookie layer into pan


Hand mixer or stand mixer
Measuring Cups and Spoons
")


Post Comment